If you’re a writer or editor and you don’t know what Track Changes is, you might be very thankful for what you’ll read next.
If you do indeed write, it’s always important to get your work edited. If you’re strapped for cash, even getting a friend or family member to look over your writing is better than nothing.
But what happens if you send through your Word document, they make some changes, send it back, and you can’t quite pick out what they’ve changed? It would be extremely inconvenient and time-consuming to bring up the before and after documents and compare them word for word.
Wouldn’t it be great if there were some feature that tracked the changes that you or someone else made to a document on Microsoft Word?
Well, there is. It’s called Track Changes, and it’s a part of Microsoft Word. I’d like to write about it today because I believe it has great value for writers and editors everywhere.
What is it?
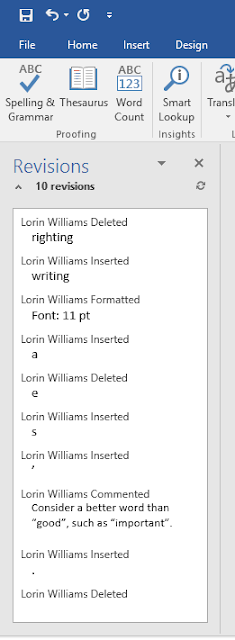
Track Changes is a review feature of Microsoft Word. Once enabled, it records any changes you make to the document, including formatting, font, insertions, deletions, and so on. You can also insert comments for the next person to read when they go through it.
You can do this sort of thing with pen and paper, which is how I was initially trained, but that's not always an option. I actually thought electronic editing would be kind of weird and no fun at all. But I was so wrong.
Since becoming familiar with Track Changes, I’ve grown very fond of it.
The idea is that a writer will send their work to an editor, the editor will do their thing using Track Changes, and then the writer will accept or reject the changes once the editor has sent it back. The comment feature is also a really convenient way to point out anything of confusion or doubt, to ask questions, or to explain edits.
I also like to throw in encouraging comments here and there when I particularly enjoy what I am reading. Sometimes if it makes me laugh, I let the author know. Genuine feedback on the overall content is as valuable as fixing technical errors, and Track Changes is a nifty way to do this.
Why should I use it?
It’s effective and convenient, saves paper and ink, and makes communication between author and editor a lot easier.
You could be anywhere in the world and still edit a document for a client, because all you need is a computer.
It’s also very easy to use. It doesn’t take long to get the hang of it, and when you do, it becomes a second nature. I think writers should become as familiar with it as editors are.
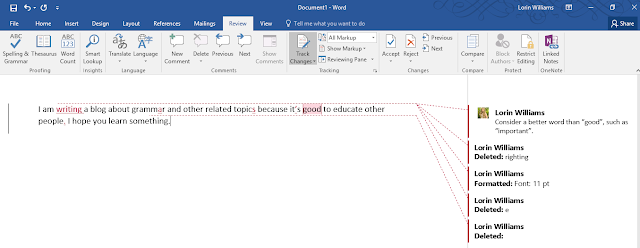
The comment feature is brilliant, because you can insert the comment right where the issue is and the author will know what part of the text you’re referring to. There is no ambiguity and they can adjust it immediately. The same applies to other changes made – they are clearly highlighted in a different colour and can be fixed at the time and incorporated into the document with great ease.
And if the author wishes to, they can insert their own comments with questions or ideas and send it back to the editor.
It’s efficient, simple, and versatile. I still love the red pen and the proof marks, but this is just a better way to do it if you can. All you need is Microsoft Word and email.
How do I use it?
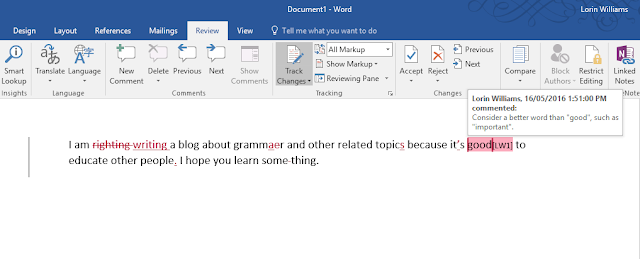
Track Changes can be found under the “Review” tab when you open Microsoft Word.
You’ll find a section off to the right that says “Track Changes”. Simply clicking that button will turn Track Changes on, and any changes made to the document will be subsequently tracked.

Next to the button there are three other subheadings to personalise the
feature. This part is basically your way to adjust how you see the changes as
they are made.
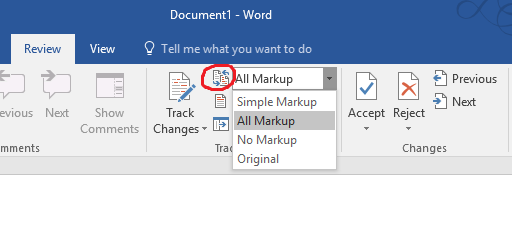 "All Markup” will show all changes made. “No Markup” means that you won’t see
the changes highlighted until you choose to reveal them again. That might be
preferable if you don’t want too many visual distractions, which can also be
achieved by selecting “Simple Markup”. “Original” shows you the document before any of your changes were made.
"All Markup” will show all changes made. “No Markup” means that you won’t see
the changes highlighted until you choose to reveal them again. That might be
preferable if you don’t want too many visual distractions, which can also be
achieved by selecting “Simple Markup”. “Original” shows you the document before any of your changes were made.
You can also pick and choose which revisions you wish to see. For example, you might find that seeing your format changes is a bit distracting, so you might want to untick formatting while you work. Or perhaps you want to go over only your formatting changes to be sure they are consistent, in which case you would untick everything but formatting.
 "All Markup” will show all changes made. “No Markup” means that you won’t see
the changes highlighted until you choose to reveal them again. That might be
preferable if you don’t want too many visual distractions, which can also be
achieved by selecting “Simple Markup”. “Original” shows you the document before any of your changes were made.
"All Markup” will show all changes made. “No Markup” means that you won’t see
the changes highlighted until you choose to reveal them again. That might be
preferable if you don’t want too many visual distractions, which can also be
achieved by selecting “Simple Markup”. “Original” shows you the document before any of your changes were made. You can also pick and choose which revisions you wish to see. For example, you might find that seeing your format changes is a bit distracting, so you might want to untick formatting while you work. Or perhaps you want to go over only your formatting changes to be sure they are consistent, in which case you would untick everything but formatting.

You also get to choose whether the changes will appear in the text, which can
be clearer, or off to the side in the margin, which can be neater.
Furthermore, there is a reviewing pane you can enable which allows you to navigate your changes.
How you adjust the above settings is entirely up to your preferences – whatever allows you to focus as you make changes or review changes.
But if you’re on the reviewing end, you might want to be sure everything is ticked and visible so you don’t miss anything as you go through it.
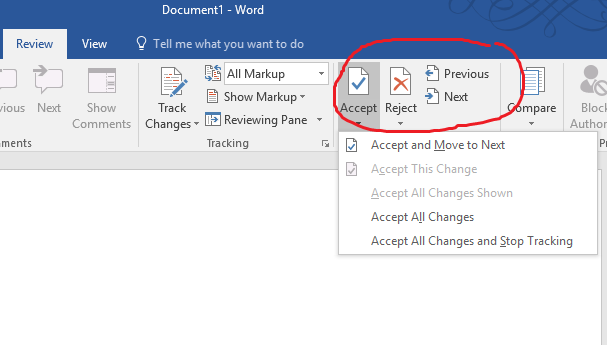
Speaking of which, there are still more buttons you can use. You can “accept” or “reject” each change as you go through them all using the “previous” and “next” buttons. You can choose to accept or reject all changes but I think it’s always good to look over them first. Hitting “previous” or “next” will just help you to navigate from change to change easier, but you can always navigate through the document manually if you prefer.
If you're looking for editing or proofreading services, be sure to visit my website to check out the services and rates I offer. Thank you for reading!www.thewritething.com.au


Furthermore, there is a reviewing pane you can enable which allows you to navigate your changes.
How you adjust the above settings is entirely up to your preferences – whatever allows you to focus as you make changes or review changes.
But if you’re on the reviewing end, you might want to be sure everything is ticked and visible so you don’t miss anything as you go through it.
Speaking of which, there are still more buttons you can use. You can “accept” or “reject” each change as you go through them all using the “previous” and “next” buttons. You can choose to accept or reject all changes but I think it’s always good to look over them first. Hitting “previous” or “next” will just help you to navigate from change to change easier, but you can always navigate through the document manually if you prefer.
Nifty, right?
I hope this has been informative and encouraging for those of you who could really use a tool like this. Computer stuff scares people off sometimes, but I promise this one is worth trying. If you have any questions or doubts, feel free to ask away!
I hope this has been informative and encouraging for those of you who could really use a tool like this. Computer stuff scares people off sometimes, but I promise this one is worth trying. If you have any questions or doubts, feel free to ask away!
If you're looking for editing or proofreading services, be sure to visit my website to check out the services and rates I offer. Thank you for reading!www.thewritething.com.au
No comments:
Post a Comment